Setup, Customize, and Manage Your Communities
TABLE OF CONTENTS
Still have questions? Contact [email protected]
What is the Communities Feature?
The Communities feature in MyAura allows you to create exclusive, interactive spaces for your audience. These communities help businesses and entrepreneurs foster engagement, offer valuable content, and build stronger relationships with members. You can create groups, manage memberships, customize your domain, and set permissions to enhance user experience.
Key Benefits of Communities
Centralized Engagement: Keep discussions, announcements, and interactions in one organized space.
Custom Branding: Set up a custom domain and personalize the community to match your brand.
Membership Management: Define roles and permissions for controlled access.
Scalability: Easily add or remove members as your community grows.
Seamless Integrations: Connect with automation tools, email marketing, and CRM features.
How to Set Up and Manage Communities
Setting up a MyAura Community allows you to centralize conversations, deliver content, and drive engagement in one branded space. This section walks you through each essential step—from creation and customization to managing roles, channels, and gamified experiences. Whether you’re starting from scratch or scaling an existing group, this guide ensures a smooth and strategic setup.
1. Create a New Community
Start by accessing the Communities section within your MyAura dashboard. From there, click Create New Community to begin building your space. This is the first step in setting up a centralized hub where your audience can engage, learn, and collaborate. Once created, you’ll be able to customize your community’s branding, structure, and membership settings.
Create Your Community Group
Define your group’s identity by entering a name, URL, and short description. This is the foundation of your community and what members will see when joining. Make it clear, inviting, and aligned with your brand or purpose. Once filled out, save your group to begin customizing and inviting members.
Email Notification Settings for MyAura Communities
These settings ensure members are informed about important updates, activities, and role changes, while also giving admins control over what gets sent. Enable or disable email notifications for your group members and customise the emails they receive.
How to Configure: Sites → Client Portal → Memberships → Settings → Email Settings → Communities → Event Reminder Email.
1. Group Invitation Email
This email is triggered when a user is added to a group.
Joined the Group (User). Sends an invite email notifying the user that they’ve been added to a specific community or group.
2. Group Membership Status Emails
These emails manage communications related to approval, rejection, and private channel assignments.
Approved (User) – Notifies a user that their membership has been approved.
Declined (User) – Alerts a user that their request to join was declined.
New Member Request (Admin) – Notifies admins when someone requests to join a group.
Declined/Removed by Admin (Admin) – Informs admins when they remove or decline a member.
Added to Private Channel (User) – Lets users know they’ve been added to a private discussion space.
3. General Group Emails
Used to keep members informed about interactions within the community.
New Comment on Post
New Comment Reply
Like on Post
Like on Comment
Tagged in Post / Tagged in Post @Everyone
Tagged in Comment / Tagged in Comment @Everyone
Content Reported – Alerts admins/moderators about flagged content.
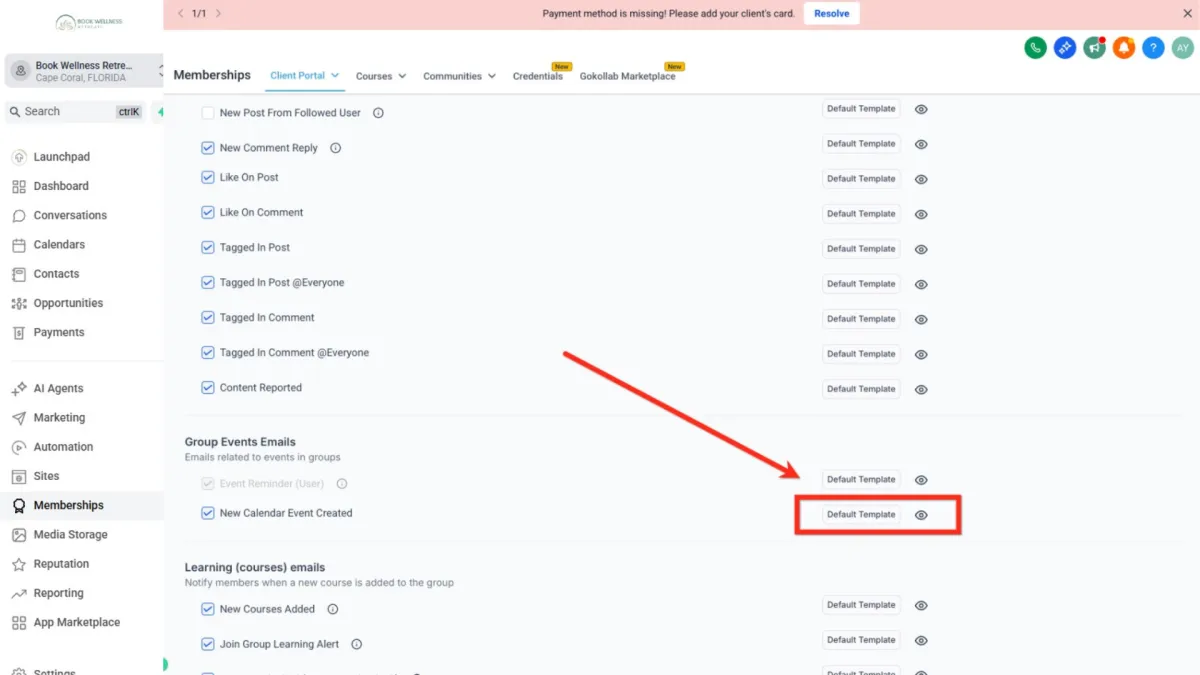
New Calendar Event Created – Notifies members when a new event is scheduled in the group.
4. Learning (Courses) Emails
Group Events Emails lets you manage notifications for community events. Choose or preview the Default.
Template for Event Reminder (User) and New Calendar Event Created using the eye icon.
5. Learning (Courses) Emails
Automated emails related to the learning journey within a group.
New Courses Added – Informs users when a new course becomes available.
Join Group Learning Alert – Sent when a user joins a group offering learning content.
Course Unlocked (Time-Based Unlock) – Triggered when a course becomes available after a set time.
Course Subscription Cancelled (User/Admin) – Notifies both parties when a subscription ends.
Course Payment Successful (User/Admin) – Confirms successful course purchase or subscription.
6. Role Change Notifications
Keeps members updated about changes to their roles or ownership within a group.
Member Role Upgraded in Channel – Sent to users when they are promoted (e.g., from member to moderator).
Group Ownership Changed (New Group Owner) – Notifies the new owner of their elevated permissions.
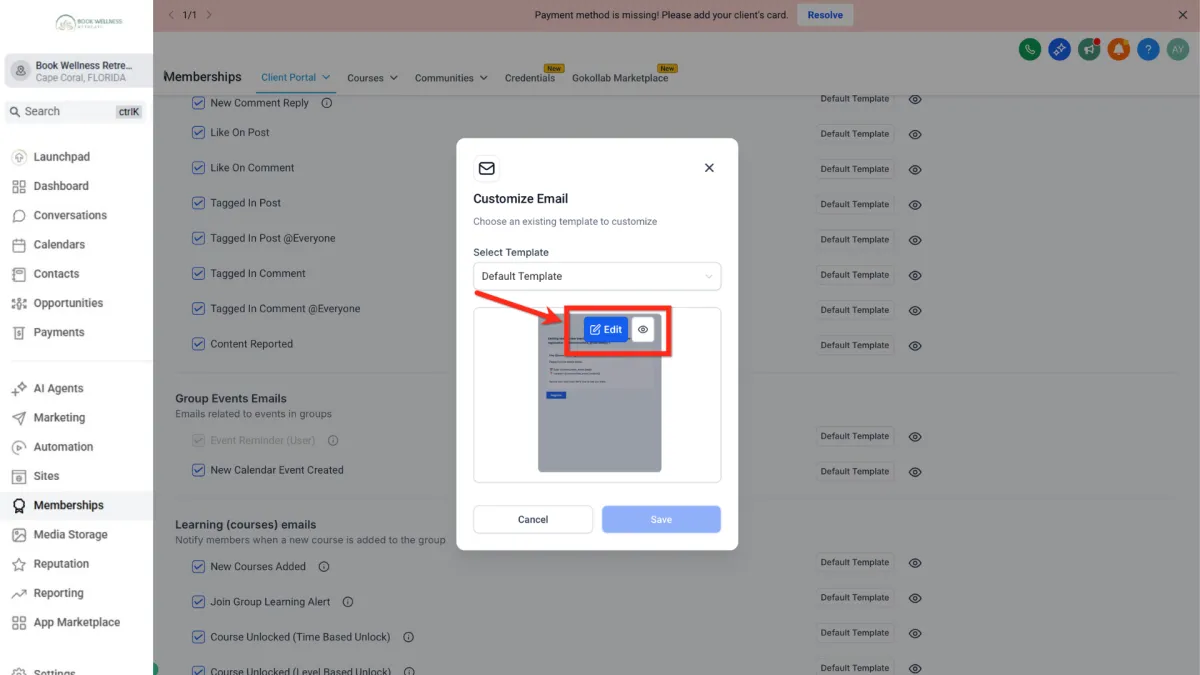
7. Customizing Email Templates
Each email type has a “Default Template” option, which you can:
Preview using the ?️ icon
Customize to match your tone, brand, and messaging style
Event Reminder Email
Customizing the reminder email helps members recognize your brand and improves RSVP rates.
Steps
1. Select Group Event Reminder Email.
2. Click Default Template and Edit to open the template.
3. Update Subject and Body; insert merge fields as needed.
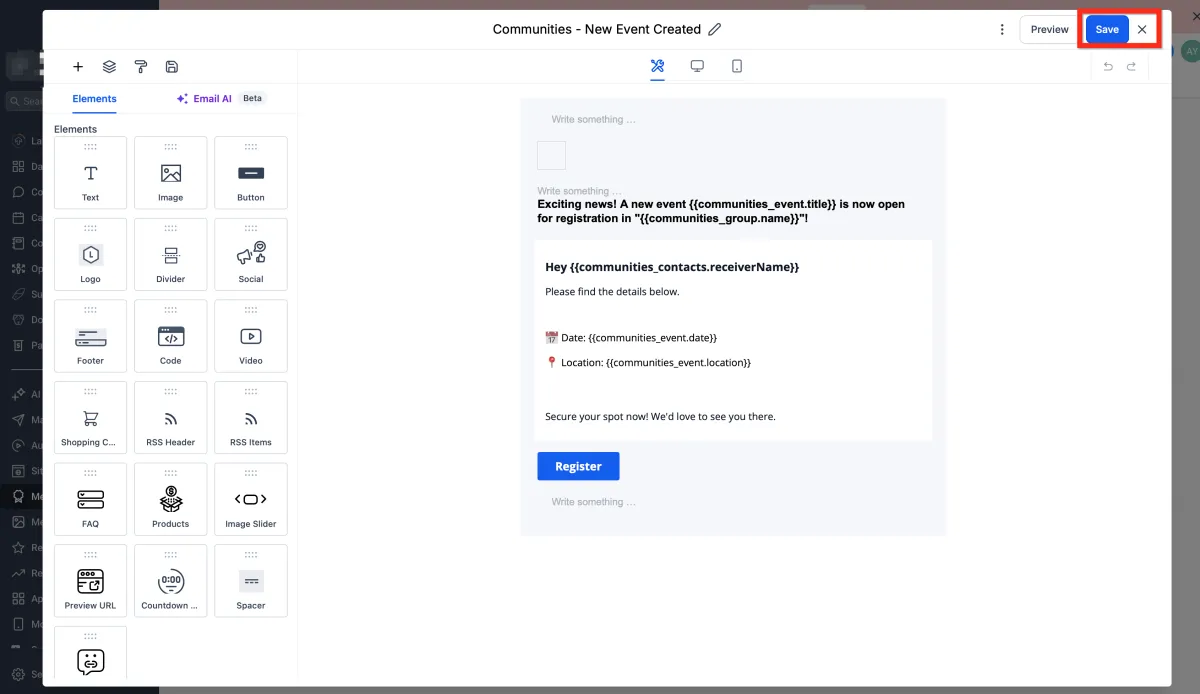
4. Preview and Save.
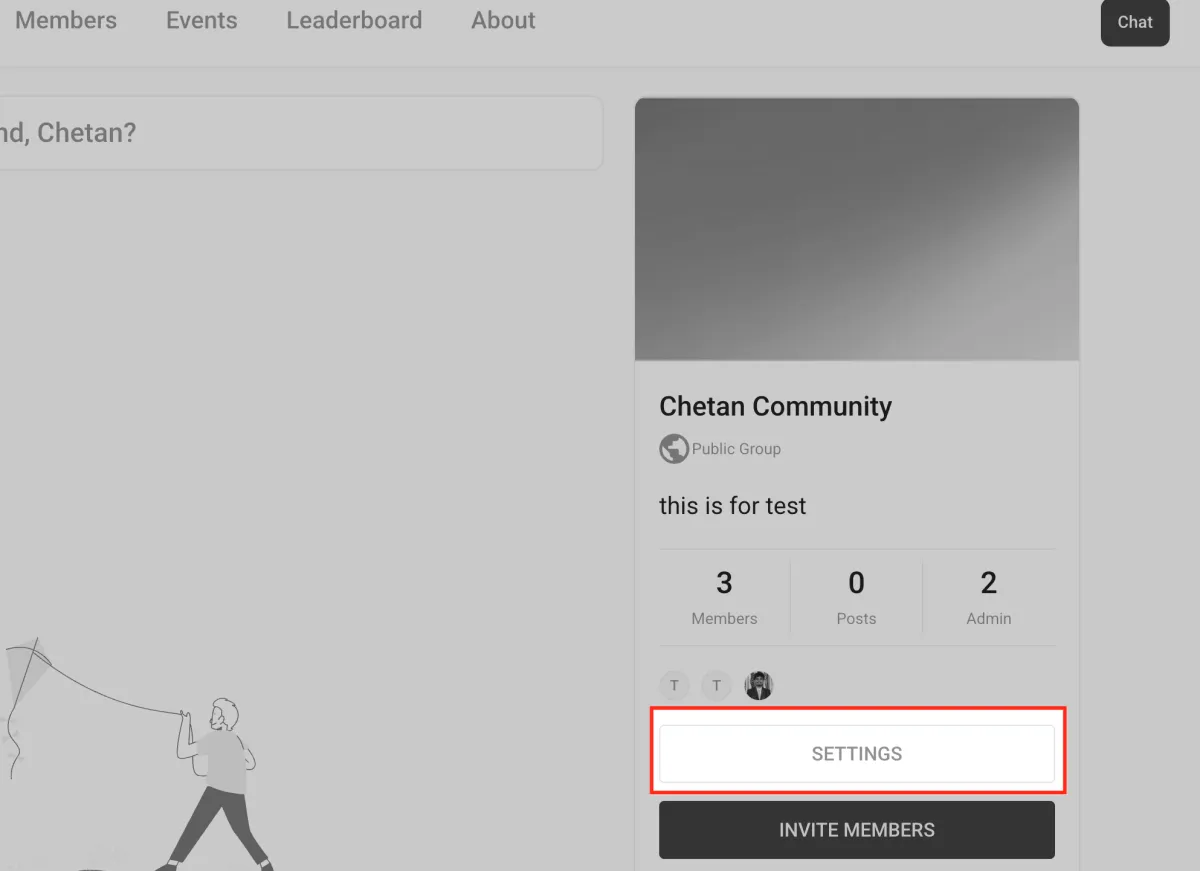
Customize Community Settings
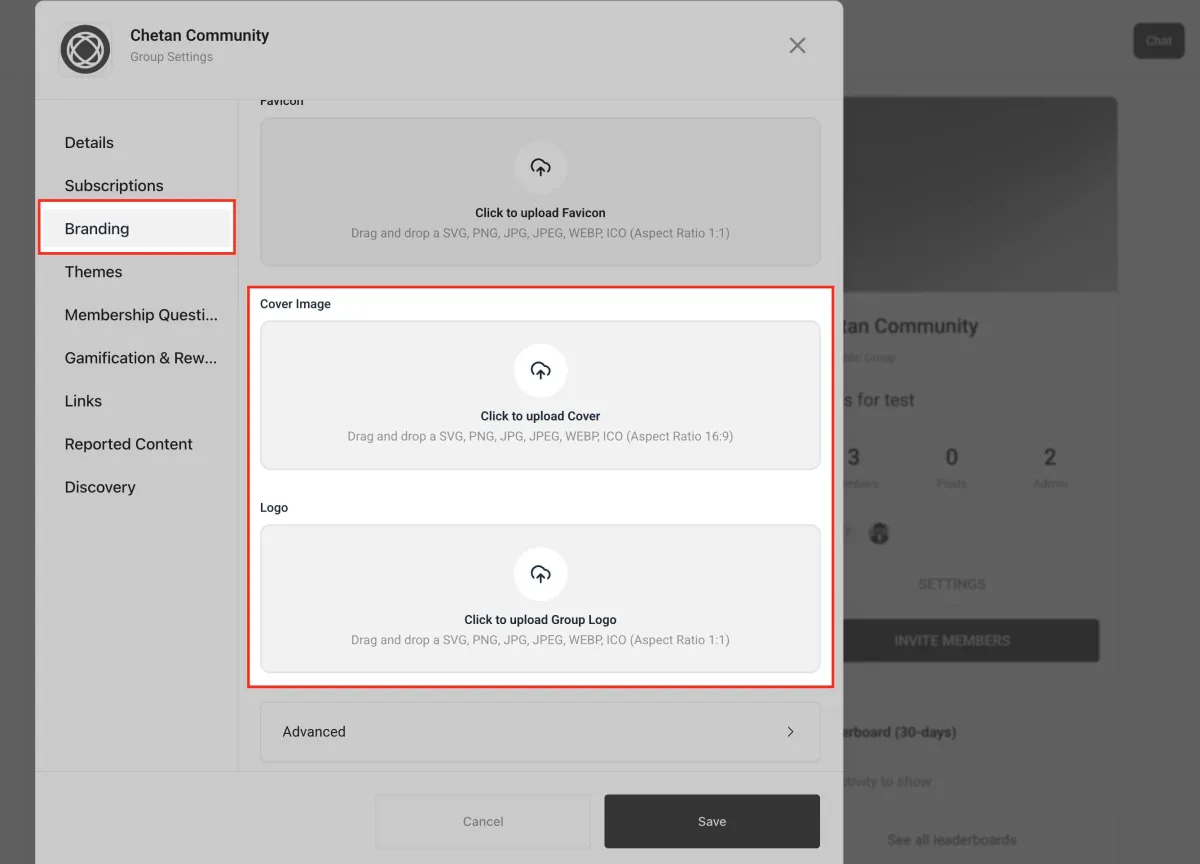
Community Settings is where you can tailor the look and feel of your community to match your brand. You’ll be able to upload your logo, cover image, and favicon, adjust the layout, and fine-tune visual elements to create a consistent, professional experience for your members.
Upload a Community Logo and Cover Image.
Branding plays a key role in building trust and recognition within your community. In the Branding tab of the Community Settings, you can upload your favicon, cover image, and logo. The favicon appears in browser tabs, the cover image gives your community visual appeal, and the logo reinforces brand identity throughout the portal. Use recommended dimensions for best display, and don’t worry—you can update these anytime.
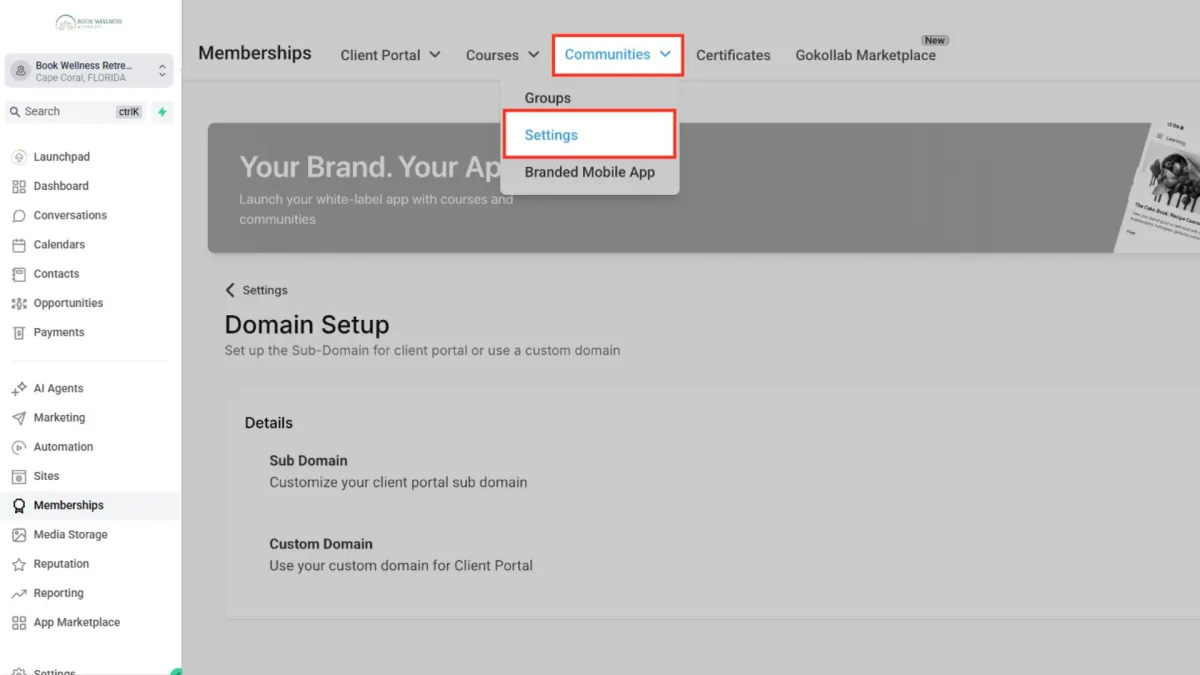
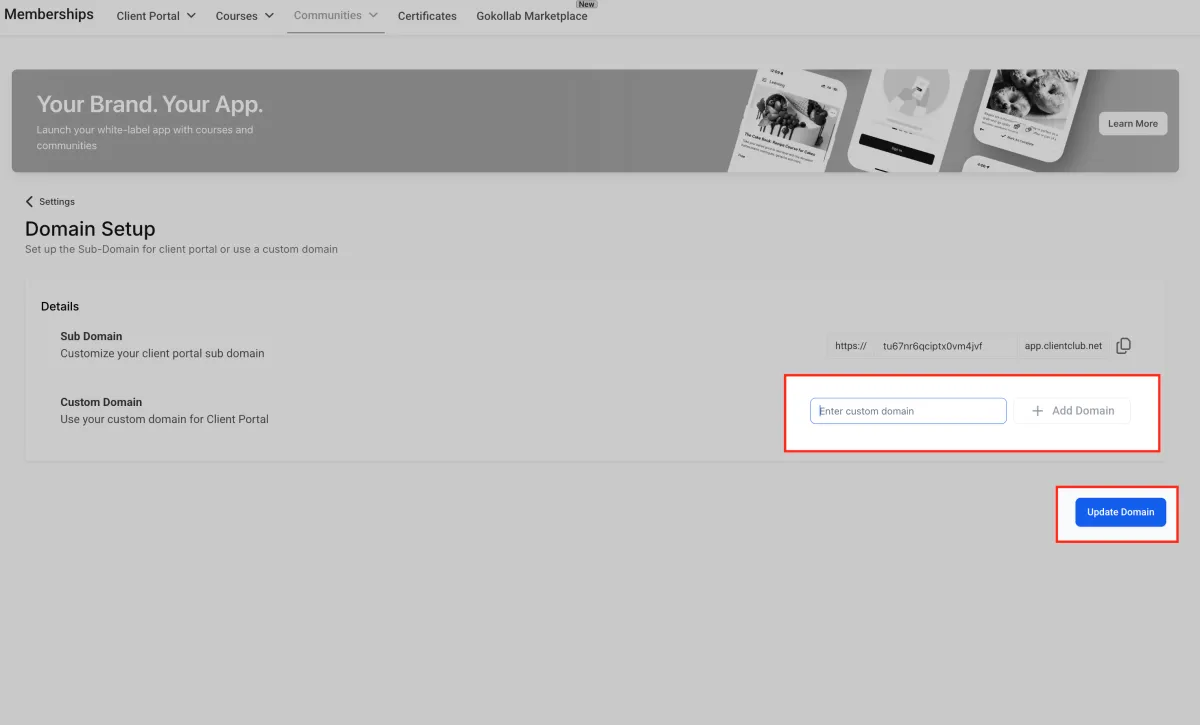
Set up a Custom Domain
A custom domain gives your community a professional touch. Instead of using the default URL, you can set up a branded domain. Navigate to "Memberships > Communities > Settings" to find the custom domain menu.
Set Up a Custom Domain
Using a custom domain gives your community a more professional and branded experience. After entering your desired domain name, you’ll need to update your DNS records. Once your records are updated, save the domain settings using the "Update Domain" button and wait for DNS propagation to complete. This process ensures your community is accessible through a custom-branded URL instead of the default system-generated one.
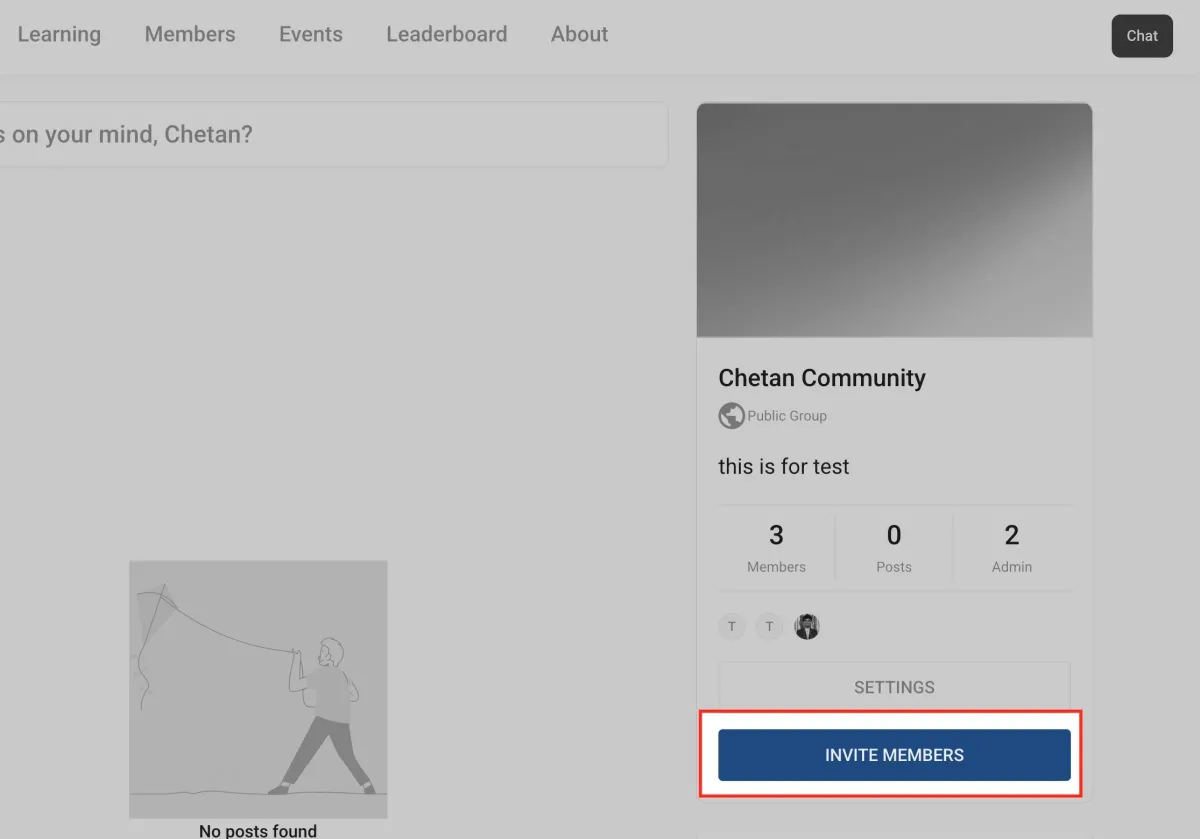
Manage Memberships and Roles
Managing access and assigning roles within your community ensures members receive the right level of interaction and control. Whether you’re running a free discussion group or a gated coaching space, assigning roles like Admin or Contributor gives you flexibility in moderation and collaboration.
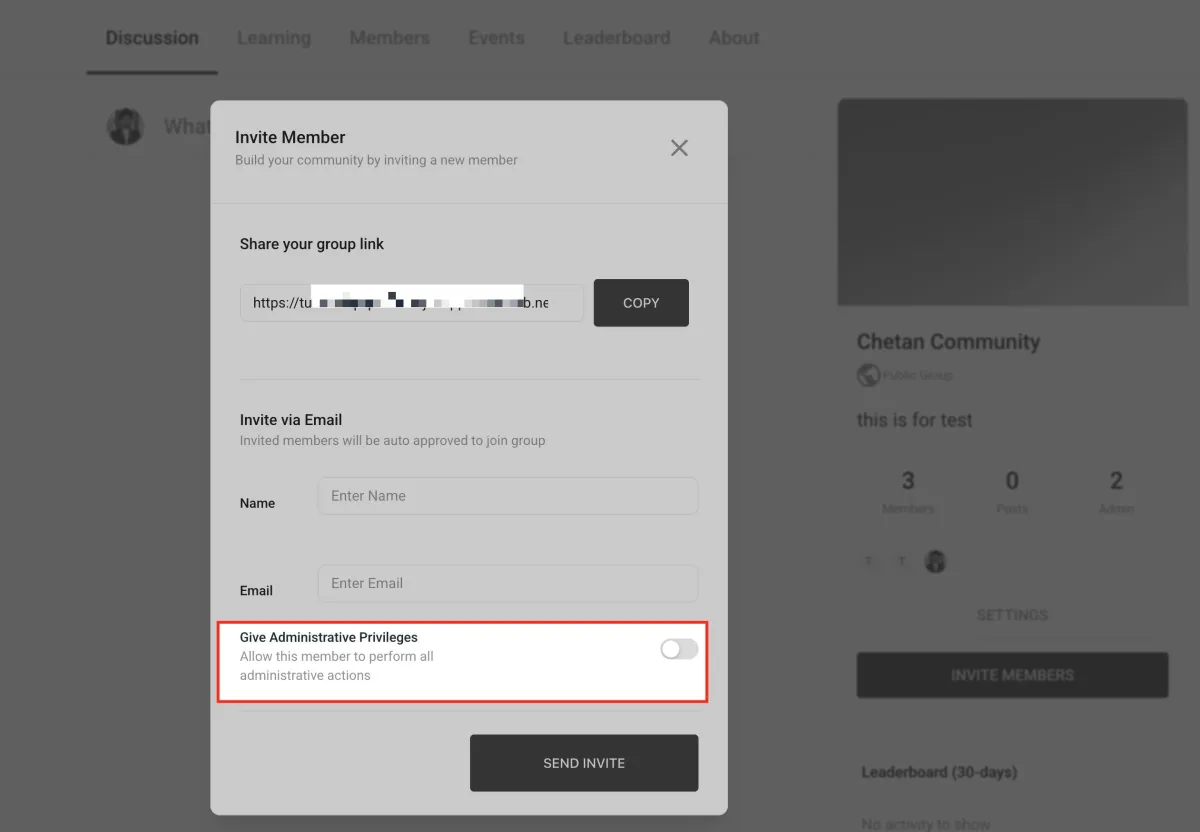
Navigate to the “Members” tab inside your community. Click the “Invite Members” button.
Admin Access
If the person needs full administrative access, you can toggle the “Give Administrative Privileges” option before sending the invite. After a member joins, you can always update their role from the Members tab using the three-dot menu next to their name. Roles include Admin (full control), Contributor (limited permissions), and Member (basic access), allowing you to tailor access based on each user’s role in your community.
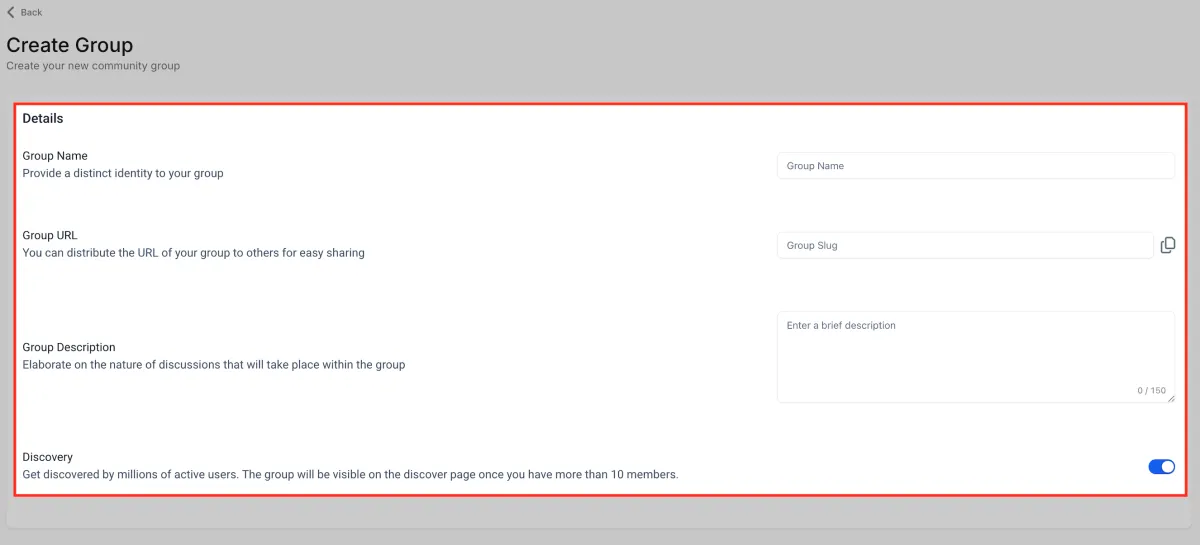
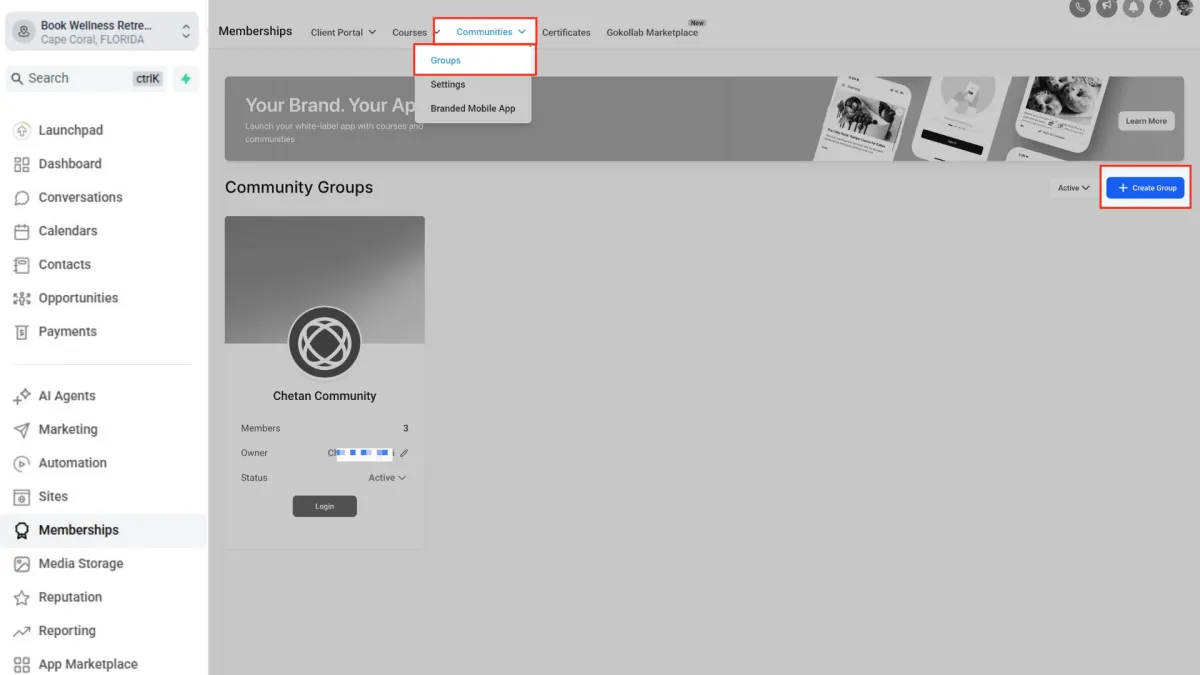
Create and Organize Groups
Groups are the heart of your community, allowing you to segment conversations, content, and member participation by interest or topic. To get started, navigate to the “Groups” section in the community panel. Click the blue “Create Group” button to launch the group setup screen. You’ll enter the group name, a short description, and select privacy settings to determine who can access the group. You can also assign moderators during setup to help manage discussions. Once configured, click “Save” to publish the group and invite members to join the conversation.
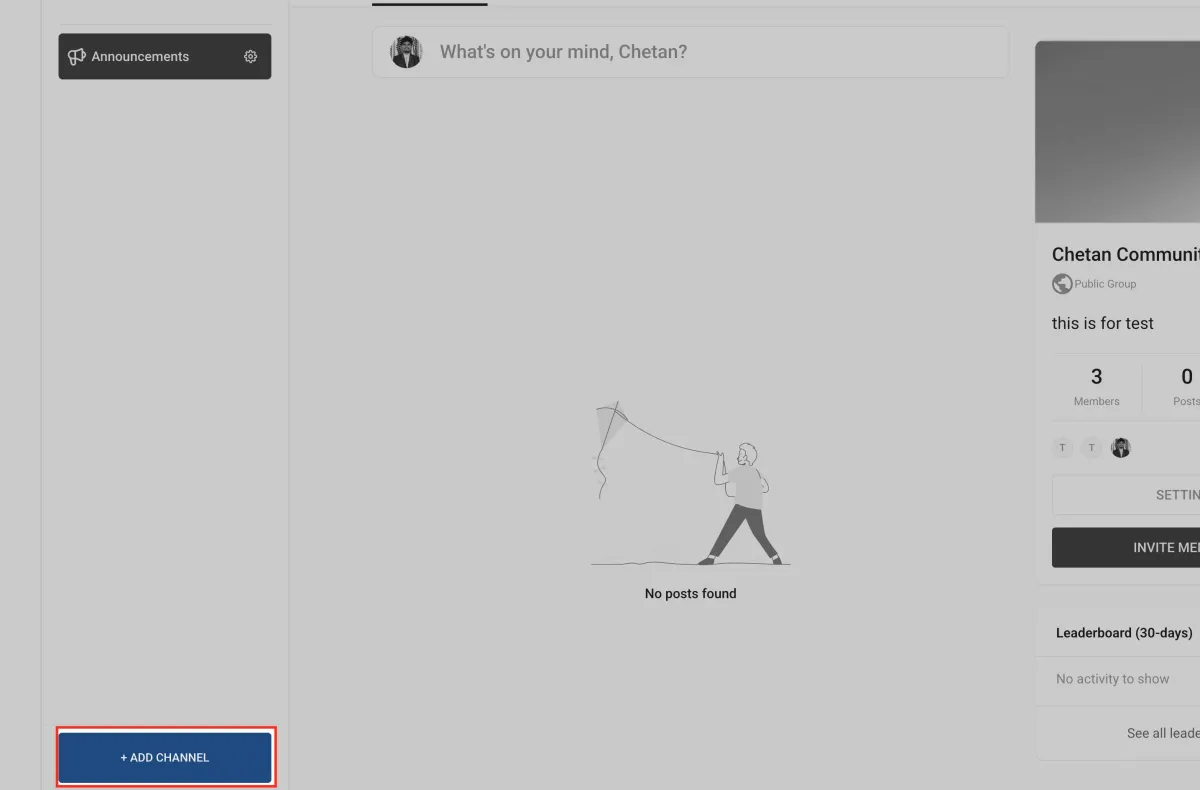
Set Up Channels
Channels help you structure conversations within your community group, making it easier for members to find and participate in discussions. To add a channel, click the ”+ Add Channel” button in the left-hand panel. You can create specific channels like Announcements for updates, SOPs for process documentation, or VIP for exclusive member content. Each channel can be customized with unique icons and privacy settings to help organize communication and ensure the right people see the right content.
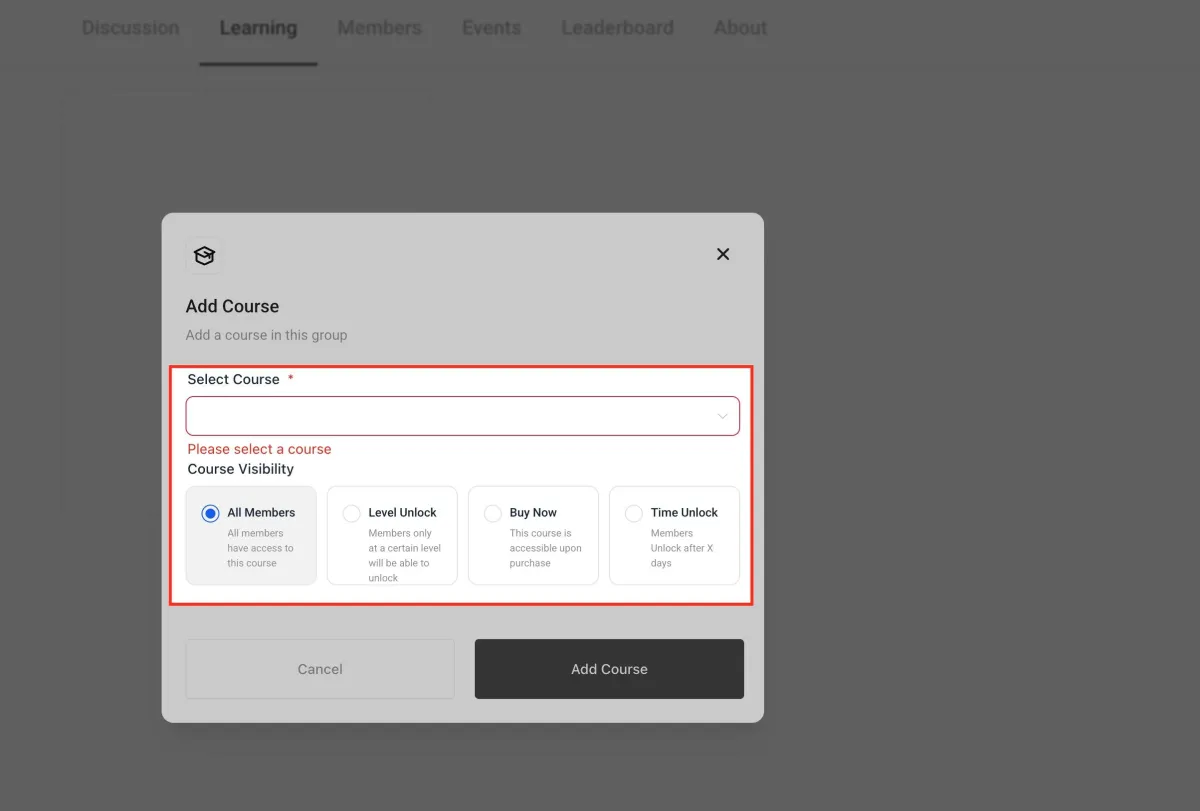
Add and Manage Courses
Courses provide structured content that can educate, onboard, or engage your community members. To get started, navigate to the Learning tab within your community. Click the “+ Add Course” button. This allows you to attach any existing course from your account to the group. Once added, members will see and access the course directly from the community. You can always manage which courses appear, control visibility settings, or remove them later as needed.
Choose Course and Set Visibility
After clicking “Add Course,” you’ll be prompted to choose an existing course from your library or create a new one. You can customize visibility settings to control access. Choose between making the course available to all members, restricting it to certain member levels, selling it via “Buy Now,” or unlocking it based on time or milestones. These options help you tailor access based on engagement, monetization strategy, or learning progression. Courses linked here are displayed only inside the community group and won’t affect the main course catalog.
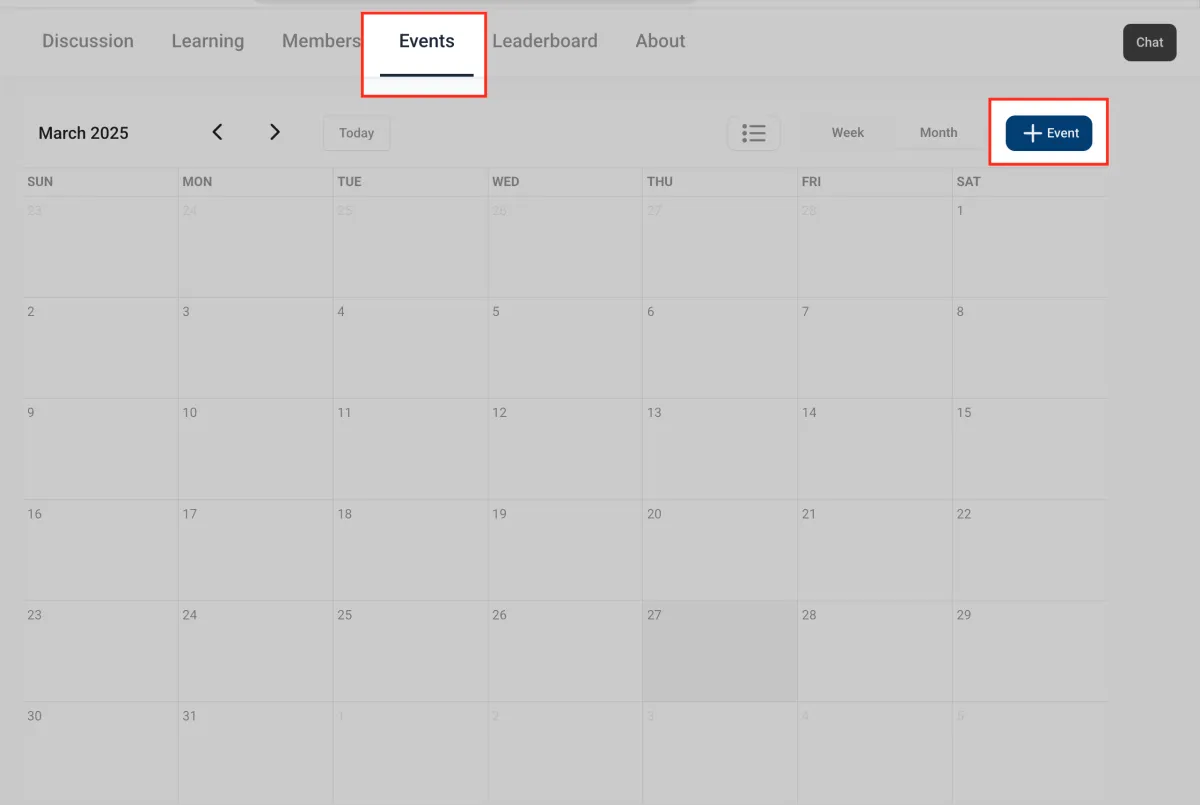
Create and Schedule Events
Events make it easy to host live sessions like office hours, AMAs, and workshops directly in your community. To schedule an event, go to the “Events” tab and click “Create Event.” Fill in the event title, description, event banner or image, and add a meeting link such as a Zoom URL. You can choose to make the event a one-time session or set it to repeat weekly or monthly. Enabling reminders ensures members receive a notification before the event begins, helping boost attendance and engagement.
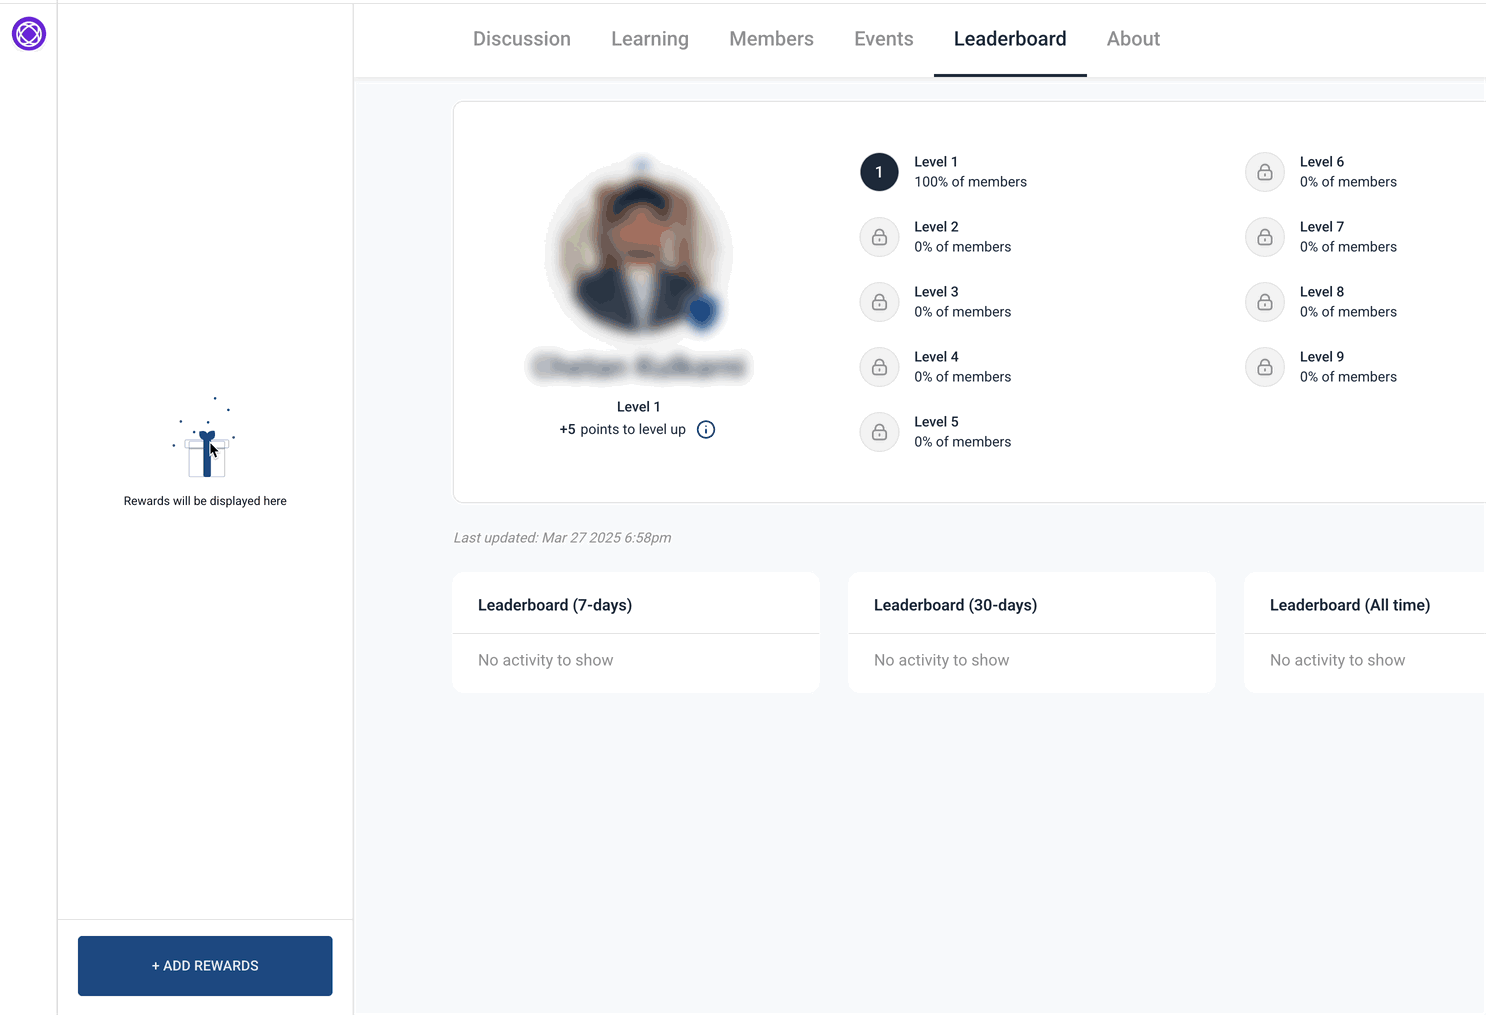
Implement Rewards and Gamification
Gamification boosts participation by making your community experience more interactive and fun. Head to the “Leaderboard” section to view or customize member levels like Bronze, Silver, or Gold. Then, go to “Gamification & Rewards” in the settings to assign rewards for reaching each level. These rewards can include course access, promo discounts, or exclusive community roles. For a fully automated experience, use workflows to trigger rewards when members complete actions like submitting a form or finishing a course. This system helps keep members active and invested in your content.
Frequently Asked Questions (FAQs)
Can I monetize my community?
Yes. You can charge for access by integrating paid membership plans.
What happens if i delete a community?
Deleting a community is irreversible. All content, members, and discussions will be permanently removed.
How do i troubleshoot domain verification issues?
Ensure your DNS records match MyAura requirements and wait for propagation (up to 48 hours). If issues persist, contact support.
How do i create courses inside the community?
Please refer to our Course Creator's Playbook for more information.
How are rewards levels determined?
Levels are based on points earned through community participation such as posts, comments, and likes. You can also assign points through automations.
Can I change a group from Public to Private after it’s created?
Yes. You can change a group’s visibility at any time by logging in to the group, navigating to Group Settings → Details, selecting Public or Private, and saving your changes.
How can I change the slug for a Community Group?
You can change a group’s slug by logging in to the group, navigating to Group Settings → Details → Discovery, editing the Slug, and saving your changes. GoKollab now treats community URLs as case-insensitive. For example, `/Community` and `/community` resolve to the same page.
Ready to Transform Your Wellness Business?
Join hundreds of wellness leaders who are nurturing their retreat businesses with our gentle yet powerful platform

The complete platform for wellness entrepreneurs to design, grow, and run their business with purpose.
Platform
Marketing Services
Support
Copyright © 2025. Book Wellness Retreats LLC, All rights reserved
Ready to Transform Your Wellness Business?
Join hundreds of wellness leaders who are nurturing their retreat businesses with our gentle yet powerful platform
The complete platform for wellness entrepreneurs to design, grow, and run their business with purpose.
Platform
Marketing Services
Support
Copyright © 2025. Book Wellness Retreats LLC, All rights reserved